Horsemanship 101 - Preparing for your Equestrian Vacation - Part One
Join us in this four part series that helps you prepare for what to expect on your horseback riding vacation
by Carol Moore
Part One: On top of Ole Smokey....now what?
You’ve finally committed yourself to that wonderful vacation the whole family has clamored for . . . a trip to a dude ranch! And now you’re starting to get the jitters just thinking about climbing on board that horse for the first time. Well, calm down. We’re going to give you a little “horsemanship 101”, just enough to help you arrive at your destination with a feeling of confidence and desire.
Picking the ranch that's right for you
If this is your first riding experience, select your ranch carefully. Make sure they cater to the beginner and have some nice easy rides that you can enjoy. Most of these properties will offer a variety of rides, and as your knowledge increases so can the complexity of the trail ride. Most importantly, when you arrive at the ranch of your choice, do not let pride interfere with a correct assessment of your riding skills. If you are a beginner, or have some skills but are a timid rider, let your wrangler know before the horse selection begins.
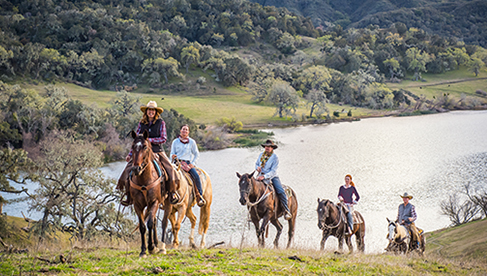
.jpg)
Enjoying a leisurely ride at the White Stallion Ranch in Tucson, Arizona. Photo by Billy Jones.
A few on-the-ground points
Riding is an unlimited field of learning and there are many excellent sources of information that can get you to the same end result. For the purpose of this lesson, we’ll assume that you will be riding western style and we’ll limit ourselves to just one way for each step. Once you feel comfortable with the basics you can expand upon this information.
Your horse’s head gear is called a bridle. The mouth piece is a bit and attached to the bit are the reins. By pulling on the reins you create tension between the bit and the curb chain (the little strap that goes under the chin and behind the bit) which controls the speed of your horse. The saddle is what you will be sitting on and the stirrups are what you put your feet into. The cinch is what holds the saddle in place and it should remain rather snug while you are riding.
If you have an opportunity to hold or lead your horse, do so from the left side. Do not hold onto the bit, instead give your horse some room and hold the reins a good 18 inches from the bit. Horses consider themselves prey animals and can be claustrophobic especially around the head. They prefer to be petted on the neck or have their back scratched rather than to have their head fussed with.
Mounting up
As you approach your horse to mount up, do so from the horse’s left side. You may wonder why the left? This habit came into being from the Calvary days when the soldiers had sabers generally worn on the left side which made it easier to swing the right leg over the horse. With someone holding your horse and helping to support your saddle, face your horse with your right shoulder next to his side. Place your left foot in the stirrup, pick up your reins in your left hand as well as a large handful of the horses mane and place the right hand on the back of the saddle. Give yourself a couple hops and up you go. Move your right hand to the front of the saddle as you swing your leg over the saddle and settle gently into the seat trying not to drop all your weight suddenly onto the horses back.
.jpg)
When mounting from the ground, remember to hold the reins and mane in your left hand and the saddle horn in your right. Photo by Laura Holden.
If the use of a mounting block is available take advantage of it. It makes life easier for you and the horse. Make the mount-up as smooth as possible and do your very best not to hang off the saddle on the way up. This is uncomfortable for the horse and will displace your saddle. When you begin to mount up totally unassisted you will want to use a method of mounting that allows you to control unexpected movement of your horse. You can learn these techniques during your ranch visit.
.jpg)
Using a mounting block makes mounting easier on you and more comfortable for your horse. Photo by Laura Holden.
Sit quietly while your wrangler adjusts your stirrups. It is easier to make these adjustments if you will put your leg forward allowing for the leather flap (the fender) to be lifted so the adjustments can be made. A general guide for the length of stirrup is to have the bottom of the stirrup even with your instep. When the adjustment is complete place the ball of your foot on the stirrup and let your feet hang directly under you. Try to imagine a straight line running from your shoulder to your hip to your heel. As you look down over your knee cap you should just see the tip of your toe. Remember to keep your heel slightly lower than your toe which will help maintain your position and good balance. If during your ride you feel top heavy, you can bet that your heels are up and that your feet are behind the imaginary line from shoulder to hip to heel. Immediately put weight into your heels and your feet will return to the proper position. Always keep even weight on both stirrups. While sitting or walking keep about ninety percent of your weight in the saddle and ten percent in the stirrups.
.jpg)
To maintain good balance and riding position, imagine a straight line that runs from your shoulder to your hip and down to your heel. Photo by Laura Holden.
Where's the steering wheel on this thing?
Western style horses respond to neck reining for steering. This system works off of indirect pressure. As you lay the left rein against the horse’s neck he will turn to the right and vice versa. It helps to reach forward a bit with your hand before making your turn so that there will be some slack in the reins and the rein will lay more directly on his neck and not so close to his shoulder. My favorite way for teaching beginners to hold the reins is to take them into one hand much like you would an ice cream cone. Your little finger is on the bottom (towards his neck) and your thumb on top, knuckles facing towards his ears). You can put your little finger between the reins if you like. Your hand should be just above and in front of the saddle horn, in fact, at a walk you may rest the heel of your hand on top of the saddle horn. To make a right hand turn, reach your hand forward and across to the right, - to make a left, reach forward and to the left. If you forget, just point your thumb in the direction you wish to go and follow that direction with your hand and the reins.
.jpg)
Neck reining, the type of steering found at most dude ranches, works by applying indirect pressure to your horse's neck. Photo by Laura Holden.
Stopping is a backward pull towards your belt buckle. If you are not able to achieve a stop by the time your hand is past the saddle horn, your reins are too long. You can easily make an adjustment, by taking your free hand and pulling the reins through your hand to the desired length. You don’t want the reins any tighter than necessary to accomplish what you are doing. Remember that the bit controls the horse with pressure between the bit and the curb strap. He will not move forward if you are pulling backward on the reins. If you wish to back your horse up, apply a steady backward pull on the reins and release the pressure after he steps back. If your horse has accidentally slipped into reverse because you had too much pressure on his mouth, reach your hand forward to release the pressure.
.jpg)
To stop, simply pull back on your reins.Photo by Laura Holden.
Moving forward
We’re ready to move off now. All forward movement must be accompanied by a slackening of the reins by reaching your hand forward. A good gauge for rein length is to have a slight belly between the bit and your hand. Remember you can easily adjust the length of the reins if more control is necessary just by pulling the reins through your hand.
To make your horse move, you will need to apply some pressure from your heels. Turn your toes outward, bring your heels close to the horse’s body and bump him as if you were elbowing someone. Start out gently and increase the pressure to achieve the desired response. Heel pressure will also assist you in motivating your horse’s turns. They move away from pressure, so use your right heel for a left turn and left heel for a right turn. Use both heels to move straight ahead. When bumping with your heels, make sure you are making body contact with the horse and are nudging him just behind the cinch. Do not draw your legs up behind you and attempt to kick high on his sides. As he starts to walk off take care not to pull back on the reins as he will most likely stop.
Some ranches will offer fairly steep mountain trails. When you are going up these hills, lift yourself slightly out of the saddle and lean forward putting your weight over the horse’s shoulders. Take a handful of the horse’s mane to ease the pull of your weight on the saddle. Your feet should stay directly under you. As you come down these hills, sit back in your saddle placing your weight towards the back of the saddle and push your feet forward of the vertical line. Allow a loose enough rein for the horse to look where he is going and progress slowly and safely at a walk down the incline. Keep a minimum of a full horse length between horses when going up and going down.
.jpg)
When riding downhill, remember to lean back and to keep your reins loose. This makes it easier and more comfortable for your horse to proceed. Photo by Laura Holden.
You are now prepared to take that first ride out of the corral and enjoy the wide open spaces. Don’t attempt to go faster that what feels safe for you. As your confidence grows, you may become curious about going faster. We’ll give you some tips for the next step in Part II. Happy Trails!
Read Part 2 of our Horsemanship 101 series!
About the author:
.jpg)
Carol Moore has been involved in the guest ranch business since 1975 and has aided many beginners with their very first horse back riding experience. Carol is currently employed at the White Stallion Ranch in Tucson, AZ. She recognized the need for an instructional riding video specifically for the vacation rider and authored the riding video “Which End Does The Hay Go In?” in 1996. This video is used extensively by many ranches as part of their horse orientation program and by lots of prospective guests prior to their ranch visit. For more information, you can e-mail Carol at hoofbeat@theriver.com or visit her website.